이번에는 구성 요소(Component)에 대해 알아보자. 공식적으로 Razor Component라고 부른다.

지난 시간까지 만든 프로젝트의 index.razor을 살펴보면 간단한 예가 있다.


<SurveyPrompt Title="How is Blazor working for you?" />


Title 파라미터에 값을 넣으면 Shared 폴더의 SurveyPrompt.razor에서 준비한 대로 결과를 볼 수 있다. 컴포넌트는 단순히 파라미터만 받는 것이 아니라 자식 콘텐츠를 갖거나 외부에서 호출하여 상태를 변화시킬 수도 있다. 간단하게 카드를 하나 만들어서 테스트해보자.


<ActionCard.razor>

1
2
3
4
5
6
7
8
9
10
11
12
13
14
15
16
17
18
19
20
21
22
23
24
25
26
27
28
29
30
31
32
33
34
35
36
37
38
39
40
41
42
43
44
45
<div class="col-xl-3 col-md-6 mb-4">
    <div class="card">
        @if (Header != null)
        {
            <div class="card-header">@Header</div>
        }
        <div class="card-body">
            @if (Title != null)
            {
                <h4 class="card-title">
                    @Title
                </h4>
            }
            @ChildContent
        </div>
        @if (Link != null)
        {
            <div class="card-footer d-flex align-items-center justify-content-between">
                <class="card-link small" target="@Blank" href="@Link">@ActionName</a>
                <div class="small"><class="oi oi-chevron-right"></i></div>
            </div>
        }
    </div>
</div>
 
@code {
    [Parameter]
    public string Header { get; set; }
 
    [Parameter]
    public string Title { get; set; }
 
    [Parameter]
    public RenderFragment ChildContent { get; set; }
 
    [Parameter]
    public string ActionName { get; set; } = "자세히";
 
    [Parameter]
    public string Blank { get; set; } = "_blank";
 
    [Parameter]
    public string Link { get; set; }
}
 
cs

일반적인 형태의 카드 컴포넌트를 만들어봤다. 외부에서 파라미터를 받고 있으면 출력하고 없으면 출력하지 않는 형태의 간단한 구조이고 RenderFragment를 사용해서 ChildContent를 출력할 수 있도록 했다.


<index.razor>

1
2
3
4
5
6
7
8
9
10
11
12
13
14
15
16
17
18
19
20
21
@page "/"
 
<div class="row">
    <ActionCard Header="카드 헤더" Title="카드 타이틀">
        사이버펑크 2077 발매일이 2일 앞으로!
    </ActionCard>
    <ActionCard Title="닷넷5" ActionName="설명서 바로가기" Blank="_self"
        Link="https://docs.microsoft.com/ko-kr/aspnet/core/?view=aspnetcore-5.0">
        헤더 없고 풋터 있음.
    </ActionCard>
    <ActionCard>
        <div class="small">
            <class="oi oi-pencil"></i><span class="ml-2"><strong>내용만 있는 카드</strong></span>
        </div>
        <div class="mt-2">
            <class="font-weight-bold" target="_blank"
                href="https://docs.microsoft.com/ko-kr/aspnet/core/?view=aspnetcore-5.0">닷넷5 설명서 바로가기</a>
        </div>
    </ActionCard>
</div>
 
cs

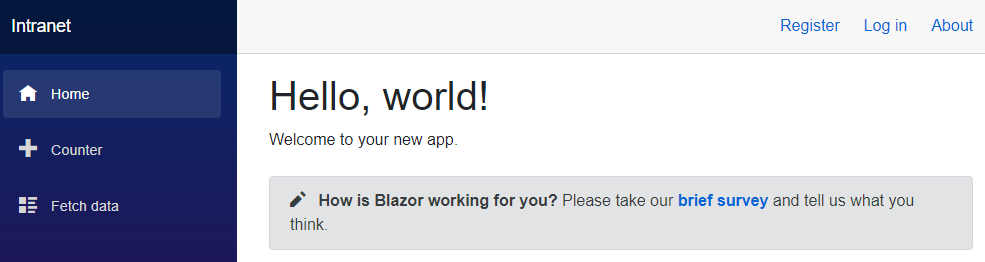
index.razor을 수정하고 실행하면 아래와 같은 카드들을 볼 수 있다.

이 밖에 네임스페이스나 특성 스플래팅, 참조 등 아래 내용을 참조하자.


ASP.NET Core Razor 구성 요소 만들기 및 사용

데이터에 바인딩하고, 이벤트를 처리하고, 구성 요소 수명 주기를 관리하는 방법을 비롯하여 Razor 구성 요소를 만들고 사용하는 방법을 알아봅니다.

docs.microsoft.com

오늘 내용 끝!


생각해보니 MySQL은 초기에 세팅되고 스캐폴딩된 부분밖에 없어서 있는지도 모르겠...

다음 시간에는 DBSet을 만들고 데이터를 넣어봐야겠다.


#End.Code123 "사이버펑크 2077이 온다! 근데 다잉라이트2는 언제 나오지..."

#2까지 진행하고 계정 가입을 했다면 현재 User 롤을 가진 계정이므로 Admin 롤 페이지에는 접근할 수 없다. 근데 만약 User와 Admin 롤이나 여러 롤들을 허용하는 페이지가 있다면?


@attribute [Authorize(Roles = "Admin, User")]


위와 같이 해주면 된다. 롤이 여러 개면 뭐 다 넣어주면 되지... 그럼 관리는?


그래서 간단하게라도 정책(Policy)을 사용하는 것이 편리하다. (정책을 거지 같이 세우면 편리하지 않다...)


방법은 매우 쉽다.


<Startup.cs>

1
2
3
4
services.AddAuthorization(options =>
{
    options.AddPolicy("IsSuper", policy => policy.RequireRole("Admin""User"));
});
cs

IsSuper 정책을 Admin과 User 모두 해당되게 묶는다. 그리고 지난번과 같이 Pages/FetchData.razor 상단에 다음을 추가하자.


@attribute [Authorize(Policy = "IsSuper")]


이제 FetchData 페이지는 Admin 그리고 User만 볼 수 있다.

개인적으로 롤이 10개 정도되고 롤에 따라 묶인 정책이 여러 개라서 매우 편리하게 쓰고 있다.


만약 좀 더 확장되게 쓰고 싶다면 AuthorizationHandler를 이용해서 핸들링하고 AddPolicy 하면 된다.

이때 policay.RequireRole을 사용하지말고 policy.Requirements.Add를 사용한다. 자세한건 아래 링크.


ASP.NET Core에서 정책 기반 권한 부여

ASP.NET Core 앱에서 권한 부여 요구 사항을 적용 하기 위한 권한 부여 정책 처리기를 만들고 사용 하는 방법에 대해 알아봅니다.

docs.microsoft.com

이어서 UserClaimsPrincipalFactory를 통해 Claim을 추가하고 우측 상단에 #1에서 추가했던 RealName이 나오도록 해보자.


<ApplicationUser.cs>

1
2
3
4
5
6
7
8
9
10
11
12
13
14
15
16
17
18
19
20
21
22
23
24
25
26
27
28
29
30
31
32
33
34
35
36
37
38
39
using Microsoft.AspNetCore.Identity;
using Microsoft.Extensions.Options;
using System;
using System.ComponentModel.DataAnnotations;
using System.ComponentModel.DataAnnotations.Schema;
using System.Security.Claims;
using System.Threading.Tasks;
 
namespace [프로젝트명].Models
{
    public class ApplicationUser : IdentityUser<long>
    {
        [DatabaseGenerated(DatabaseGeneratedOption.Identity)]
        public DateTime Created { get; set; }
 
        [Required]
        [Column(TypeName = "CHAR(30)")]
        public string RealName { get; set; }
    }
 
    public class ApplicationUserClaimsPrincipalFactory : UserClaimsPrincipalFactory<ApplicationUser, IdentityRole<long>>
    {
        public ApplicationUserClaimsPrincipalFactory(
            UserManager<ApplicationUser> userManager,
            RoleManager<IdentityRole<long>> roleManager,
            IOptions<IdentityOptions> optionsAccessor)
            : base(userManager, roleManager, optionsAccessor)
        {
        }
 
        protected override async Task<ClaimsIdentity> GenerateClaimsAsync(ApplicationUser user)
        {
            var identity = await base.GenerateClaimsAsync(user);
            identity.AddClaim(new Claim("RealName", user.RealName));
            return identity;
        }
    }
}
 
cs

ApplicationUser는 기존과 변화없고 UserClaimsPrincipalFactory의 GenerateClaimsAsync를 재정의하여 RealName을 추가해 준다.


<Startup.cs>

1
2
3
4
services.AddIdentity<ApplicationUser, IdentityRole<long>>()
    .AddDefaultUI()
    .AddEntityFrameworkStores<ApplicationDbContext>()
    .AddClaimsPrincipalFactory<ApplicationUserClaimsPrincipalFactory>();
cs

Startup.cs에서 AddIdentity 부분을 위와 같이 수정하면 끝!

이렇게 추가된 Claim은 아래와 같이 사용할 수 있다.


<LoginDisplay.razor>

1
2
3
4
5
6
7
8
9
10
11
12
<AuthorizeView>
    <Authorized>
        <a href="Identity/Account/Manage">@context.User.FindFirst("RealName").Value</a>
        <form method="post" action="Identity/Account/LogOut">
            <button type="submit" class="nav-link btn btn-link">Log out</button>
        </form>
    </Authorized>
    <NotAuthorized>
        <a href="Identity/Account/ExternalLogin?provider=Google&returnUrl=/">Log in</a>
    </NotAuthorized>
</AuthorizeView>
 
cs

@context.User.FindFirst("RealName").Value


오늘은 여기까지!


#End.Code123 "코로나 조심하세요!"

지난 시간에 구글 로그인까지 완료했으니 첫 로그인 시 등장하는 등록 페이지를 조금 바꿔보자.

먼저, 인증과 관련된 페이지는 어떤 것들이 있는지 살펴보기 위해 다음 커맨드를 입력한다.


> dotnet aspnet-codegenerator identity --listFiles


Account.으로 시작하는 파일들이 많이 보일텐데 지금 필요한 파일은 ExternalLogin!


> dotnet aspnet-codegenerator identity -dc 프로젝트이름.Data.ApplicationDbContext --files "Account.ExternalLogin"


지금 필요한 ExternalLogin 페이지가 Area/Identity/Pages/Account/ 위치에 스캐폴드가 적용되어 파일이 생성된걸 확인할 수 있다. 여러 사용자들이 로그인하는 웹사이트를 만들고 있는 사람이라면 ExternalLogin 뿐만 아니라 Login, Register 등등 다양한 페이지를 입맛에 맞게 바꾸자~


(스캐폴드하면서 생긴 _ManageNav.cshtml에서 기본적인 IndentityUser 사용하므로 지난 시간에 만든 ApplicationUser로 변경해 줘야 함)


<ExternalLogin.cshtml>

1
2
3
4
5
6
7
8
9
10
11
12
13
14
15
16
17
18
19
20
21
22
23
24
25
26
27
28
29
30
31
32
33
34
35
36
37
@page
@model ExternalLoginModel
@{
    ViewData["Title"= "신규 등록";
}
 
<h1>@ViewData["Title"]</h1>
<h4 id="external-login-title">공급자(@Model.ProviderDisplayName)로부터 제공받은 계정을 연결합니다.</h4>
<hr />
 
<p id="external-login-description" class="text-info">
    이하 모든 사항을 기입하면 모든 등록 절차가 완료됩니다.
</p>
 
<div class="row">
    <div class="col-md-4">
        <form asp-page-handler="Confirmation" asp-route-returnUrl="@Model.ReturnUrl" method="post">
            <div asp-validation-summary="ModelOnly" class="text-danger"></div>
            <div class="form-group">
                <label asp-for="Input.Email"></label>
                <input asp-for="Input.Email" class="form-control" readonly/>
                <span asp-validation-for="Input.Email" class="text-danger"></span>
            </div>
            <div class="form-group">
                <label asp-for="Input.RealName"></label>
                <input asp-for="Input.RealName" class="form-control" />
                <span asp-validation-for="Input.RealName" class="text-danger"></span>
            </div>
            <button type="submit" class="btn btn-primary">Register</button>
        </form>
    </div>
</div>
 
@section Scripts {
    <partial name="_ValidationScriptsPartial" />
}
 
cs

<ExternalLogin.cshtml.cs>

1
2
3
4
5
6
7
8
9
10
11
12
13
14
15
16
17
18
19
20
21
22
23
24
25
26
27
28
29
30
31
32
33
34
35
36
37
38
39
40
41
42
43
44
45
46
47
48
49
50
51
52
53
54
55
56
57
58
59
60
61
62
63
64
65
66
67
68
69
70
71
72
73
74
75
76
77
78
79
80
81
82
83
84
85
86
87
88
89
90
91
92
93
94
95
96
97
98
99
100
101
102
103
104
105
106
107
108
109
110
111
112
113
114
115
116
117
118
119
120
121
122
123
124
125
126
127
128
129
130
131
132
133
134
135
136
137
138
139
140
141
142
143
144
145
146
147
148
149
150
151
152
153
154
155
156
157
158
159
160
using System;
using System.Collections.Generic;
using System.ComponentModel.DataAnnotations;
using System.Linq;
using System.Security.Claims;
using System.Text;
using System.Text.Encodings.Web;
using System.Threading.Tasks;
using Microsoft.AspNetCore.Authorization;
using Microsoft.AspNetCore.Identity;
using Microsoft.AspNetCore.Identity.UI.Services;
using Microsoft.AspNetCore.Mvc;
using Microsoft.AspNetCore.Mvc.RazorPages;
using Microsoft.AspNetCore.WebUtilities;
using Microsoft.Extensions.Logging;
using [프로젝트명].Models;
 
namespace [프로젝트명].Areas.Identity.Pages.Account
{
    [AllowAnonymous]
    public class ExternalLoginModel : PageModel
    {
        private readonly SignInManager<ApplicationUser> _signInManager;
        private readonly UserManager<ApplicationUser> _userManager;
        private readonly IEmailSender _emailSender;
        private readonly ILogger<ExternalLoginModel> _logger;
 
        public ExternalLoginModel(
            SignInManager<ApplicationUser> signInManager,
            UserManager<ApplicationUser> userManager,
            ILogger<ExternalLoginModel> logger,
            IEmailSender emailSender)
        {
            _signInManager = signInManager;
            _userManager = userManager;
            _logger = logger;
            _emailSender = emailSender;
        }
 
        [BindProperty]
        public InputModel Input { get; set; }
 
        public string ProviderDisplayName { get; set; }
 
        public string ReturnUrl { get; set; }
 
        [TempData]
        public string ErrorMessage { get; set; }
 
        public class InputModel
        {
            [Required]
            [EmailAddress]
            [Display(Name = "ID / E-Mail")]
            public string Email { get; set; }
 
            [Required(ErrorMessage = "사용자 이름을 입력해주세요.")]
            [StringLength(30, ErrorMessage = "최소 {2}자 이상 입력해야 합니다.", MinimumLength = 2)]
            [Display(Name = "사용자 이름")]
            public string RealName { get; set; }
        }
 
        public IActionResult OnGetAsync(string provider, string returnUrl = null)
        {
            return OnPost(provider, returnUrl);
            // return RedirectToPage("./Login");
        }
 
        public IActionResult OnPost(string provider, string returnUrl = null)
        {
            // Request a redirect to the external login provider.
            var redirectUrl = Url.Page("./ExternalLogin", pageHandler: "Callback", values: new { returnUrl });
            var properties = _signInManager.ConfigureExternalAuthenticationProperties(provider, redirectUrl);
            return new ChallengeResult(provider, properties);
        }
 
        public async Task<IActionResult> OnGetCallbackAsync(string returnUrl = nullstring remoteError = null)
        {
            returnUrl = returnUrl ?? Url.Content("~/");
            if (remoteError != null)
            {
                ErrorMessage = $"Error from external provider: {remoteError}";
                return RedirectToPage("./Login"new { ReturnUrl = returnUrl });
            }
            var info = await _signInManager.GetExternalLoginInfoAsync();
            if (info == null)
            {
                ErrorMessage = "Error loading external login information.";
                return RedirectToPage("./Login"new { ReturnUrl = returnUrl });
            }
 
            // Sign in the user with this external login provider if the user already has a login.
            var result = await _signInManager.ExternalLoginSignInAsync(info.LoginProvider, info.ProviderKey, isPersistent: false, bypassTwoFactor: true);
            if (result.Succeeded)
            {
                _logger.LogInformation("{Name} logged in with {LoginProvider} provider.", info.Principal.Identity.Name, info.LoginProvider);
                return LocalRedirect(returnUrl);
            }
            if (result.IsLockedOut)
            {
                return RedirectToPage("./Lockout");
            }
            else
            {
                // If the user does not have an account, then ask the user to create an account.
                ReturnUrl = returnUrl;
                ProviderDisplayName = info.ProviderDisplayName;
                if (info.Principal.HasClaim(c => c.Type == ClaimTypes.Email))
                {
                    Input = new InputModel
                    {
                        Email = info.Principal.FindFirstValue(ClaimTypes.Email)
                    };
                }
                return Page();
            }
        }
 
        public async Task<IActionResult> OnPostConfirmationAsync(string returnUrl = null)
        {
            returnUrl = returnUrl ?? Url.Content("~/");
            // Get the information about the user from the external login provider
            var info = await _signInManager.GetExternalLoginInfoAsync();
            if (info == null)
            {
                ErrorMessage = "Error loading external login information during confirmation.";
                return RedirectToPage("./Login"new { ReturnUrl = returnUrl });
            }
 
            if (ModelState.IsValid)
            {
                var user = new ApplicationUser { UserName = Input.Email, Email = Input.Email, RealName = Input.RealName };
 
                var result = await _userManager.CreateAsync(user);
                if (result.Succeeded)
                {
                    result = await _userManager.AddLoginAsync(user, info);
                    if (result.Succeeded)
                    {
                        _logger.LogInformation("User created an account using {Name} provider.", info.LoginProvider);
 
                        await _signInManager.SignInAsync(user, isPersistent: false, info.LoginProvider);
                        await _userManager.AddToRoleAsync(user, "User");
 
                        return LocalRedirect(returnUrl);
                    }
                }
                foreach (var error in result.Errors)
                {
                    ModelState.AddModelError(string.Empty, error.Description);
                }
            }
 
            ProviderDisplayName = info.ProviderDisplayName;
            ReturnUrl = returnUrl;
            return Page();
        }
    }
}
 
cs

Email의 경우 유니크한 값이고 AspNetUsers 테이블에서 NormalizedUserName은 유니크한 필드이기 때문에 첫 로그인시 등장하는 등록 페이지에서 Provider에게 받은 주소를 변경할 수 없도록 하고 지난 시간 만든 ApplicationUser에 추가한 RealName을 통해 실제 사용자의 이름을 받는 형태로 바꾸었다.


OnGetAsync의 경우 RedirectToPage를 리턴하지 않고 OnPost를 콜 했는데 그 이유는 Shared 폴더의 LoginDisplay.razor을 다음과 같이 수정했기 때문이다.


<LoginDisplay.razor>

1
2
3
4
5
6
7
8
9
10
11
12
13
<AuthorizeView>
    <Authorized>
        <a href="Identity/Account/Manage">Hello, @context.User.Identity.Name!</a>
        <form method="post" action="Identity/Account/LogOut">
            <button type="submit" class="nav-link btn btn-link">Log out</button>
        </form>
    </Authorized>
    <NotAuthorized>
        <a href="Identity/Account/Register">Register</a>
        <a href="Identity/Account/ExternalLogin?provider=Google&returnUrl=/">Log in</a>
    </NotAuthorized>
</AuthorizeView>
 
cs

위와 같은 수정으로 우측 상단의 로그인 페이지를 누르면 즉시 구글 로그인으로 향한다. 현재 개발 중인 인트라넷에서는 구글 인증외의 로그인은 허용하지 않기 때문에 이와 같이 해두는 것이 편하다.


이쯤되서 Pages/FetchData.razor 상단에 인증 속성을 추가 해보자.


@page "/fetchdata"

@attribute [Authorize]


이렇게 하면 해당 페이지는 로그인 하지 않은 사용자의 경우 볼 수 없게 된다. 만약 롤로 구분하려면?


@attribute [Authorize(Roles = "Admin")]


이렇게 하면 현재 추가되는 유저는 기본으로 User 롤을 가지기 때문에 로그인이 되었다해도 해당 페이지는 볼 수 없다.

오늘은 여기까지~


#End.Code123 "블로그질만 시작하면 회사 일정이 많아진다. 신기하다..."

아주 오랜만에 작성하는 글!

Vue 기반으로 되어 있던 인트라넷을 Vue 3.0이 아닌 .NET으로 변경하는 작업을 진행 중이다.

이 작업이 끝나면 회사의 거의 모든 코드는 C# 기반이 된다. Java가 하나 남긴 하지만...


C#은 2.0 시절 네트워크 엔진 만든 후로 Unity3D 환경 외에서의 작업은 처음이다.

이 글을 쓰기 전까지 많은 고생을 하고 지금도...


어쨌든 시작!


.NET 5부터 받고 설치~


Download .NET (Linux, macOS, and Windows)

Free downloads for building and running .NET apps on Linux, macOS, and Windows. Runtimes, SDKs, and developer packs for .NET Framework, .NET Core, and ASP.NET.

dotnet.microsoft.com

Visual Studio Code(이하 VSCode)까지 설치한 후 Extensions 탭에서 C# 확장 기능을 설치해야 정신건강에 이로운 코딩이 가능해진다. 

이제 파워쉘[컨트롤 + ~]에서 툴을 설치하고 프로젝트까지 생성한다.

> dotnet tool install -g dotnet-ef

> dotnet tool install -g dotnet-aspnet-codegenerator

> dotnet new blazorserver -au Individual -o 프로젝트이름


DB 마이그레이션이나 스캐폴딩을 위해 2가지 툴을 설치하고 프로젝트는 개인 인증을 지원하는 형태로 blazorserver를 생성했다. 폴더를 VSCode에 추가[CTRL + KO]하고 기본 화면이 뭔지 확인하자. [CTRL+F5]

역시나 헬로우 월드!

이제 필요한 몇 가지 패키지를 추가해 주기 위해 다시 커맨드를 입력하자.


> dotnet add package Microsoft.AspNetCore.Authentication.Google

> dotnet add package Microsoft.VisualStudio.Web.CodeGeneration.Design

> dotnet add package Microsoft.EntityFrameworkCore.SqlServer

> dotnet add package Pomelo.EntityFrameworkCore.MySql --version 5.0.0-alpha.2


구글 로그인과 스캐폴딩을 위해 필요한 패키지 그리고 MySQL 서버를 쓰기 위해 필요한 패키지다. MySQL 패키지의 5 버전은 현재 알파 버전인걸 알고 쓰자. (참고는 이쪽 www.nuget.org/packages?q=mysql)


다음은 구글 로그인에 사용할 사용자 인증 정보를 만들어야 한다.

회사는 현재 Google Cloud Platform을 사용하고 있기 때문에 프로젝트 하나 만들어서 진행했다. 새로 만들어야 하는 경우 구글에서 구글 API 검색해서 진행하면 된다.


먼저 좌측의 OAuth 동의 화면에서 사용자 유형을 결정해야 하는데 외부/내부가 있다. 내부는 GSuite을 사용하는 내부 조직에 있는 사용자만 로그인 가능하게 하는 것이므로 그렇지 않은 경우라면 외부를 선택하자.


그 후 사용자 인증 정보 메뉴를 누르고 위와 같이 사용자 인증 정보 만들기를 통해서 "OAuth 2.0 클라이언트 ID" 선택 후 이름 정하고 승인된 리디렉션 URI에 다음과 같은 주소를 넣어주자.


https://localhost:5001/signin-google


위와 같이 승인된 리디렉션 URI를 설정하지 않으면 나중에 테스트할 때 다음과 같은 오류를 만나게 된다.

"400 오류: redirect_uri_mismatch"


이제 생성된 클라이언트 ID와 보안 값으로 appsettings.json 파일에 설정을 추가한다.


"Google": {

  "ClientId""생성한 클라이언트 ID",

  "ClientSecret""생성한 클라이언트 Secret"

}


이미 설정되어 있는 DB 관련 정보도 자신의 MySQL 정보로 바꿔 준다.


"ConnectionStrings": {

    "DefaultConnection""Server=서버IP;Port=포트;Database=디비이름;User=유저;Password=비번;Pooling=true;Max Pool Size=풀 사이즈"

}


기본적인 설정은 끝났으므로 살짝~ 코딩하고 디비까지 만들자. 먼저, Models 폴더를 만들고 인증에 사용되는 사용자 정보를 확장하기 위해 IdentityUser를 상속 받는 모델을 하나 만든다.


<Models/ApplicationUser.cs>

1
2
3
4
5
6
7
8
9
10
11
12
namespace [프로젝트명].Models
{
    public class ApplicationUser : IdentityUser<long>
    {
        [DatabaseGenerated(DatabaseGeneratedOption.Identity)]
        public DateTime Created { get; set; }
 
        // [Required] 반드시 필요한 필드의 경우
        [Column(TypeName = "CHAR(30)")]
        public string RealName { get; set; }
    }
}
cs

데이터가 들어가는 시간을 DB에서 자동으로 처리하도록 추가하거나 별명이나 기본적으로 본인의 사이트에서 유저 테이블에서 사용해야 하는 값을 ApplicationUser 클래스에 추가하여 확장된 AspNetUser 테이블을 만들 수 있다. 제너릭 인수 long은 테이블의 ID 값의 타입을 정해준 것이다.


이제 기본적인 IdentityUser가 아닌 ApplicationUser를 사용하기 때문에 소스 여기저기를 바꿔줘야 한다.


<ApplicationDbContext.cs>

1
2
3
4
5
6
7
8
9
10
11
12
13
14
15
16
17
18
19
20
21
22
23
24
25
26
using System;
using System.Collections.Generic;
using System.Text;
using Microsoft.AspNetCore.Identity;
using Microsoft.AspNetCore.Identity.EntityFrameworkCore;
using Microsoft.EntityFrameworkCore;
using [프로젝트명].Models;
 
namespace [프로젝트명].Data
{
    public class ApplicationDbContext : IdentityDbContext<ApplicationUser, IdentityRole<long>long>
    {
        public ApplicationDbContext(DbContextOptions<ApplicationDbContext> options)
            : base(options)
        {
        }
 
        protected override void OnModelCreating(ModelBuilder builder)
        {
            base.OnModelCreating(builder);
 
            builder.Entity<IdentityRole<long>>().HasData(new IdentityRole<long> { Id = 1, Name = "Admin", NormalizedName = "Admin".ToUpper() });
            builder.Entity<IdentityRole<long>>().HasData(new IdentityRole<long> { Id = 2, Name = "User", NormalizedName = "User".ToUpper() });
        }
    }
}
cs

IdentityDbContext 제너릭 인수를 통해 ApplicationUser를 넘겨주고 id 값을 long으로 사용하기 위한 설정 그리고 디비가 만들어질때 기본적인 룰로 Admin 그리고 User가 추가 되도록 했다.


<Startup.cs>

1
2
3
4
5
6
7
8
9
10
11
12
13
14
15
16
17
18
19
20
21
services.AddDbContext<ApplicationDbContext>(options =>
    options.UseMySql(Configuration.GetConnectionString("DefaultConnection"), new MySqlServerVersion(new Version(58))));
 
services.AddIdentity<ApplicationUser, IdentityRole<long>>()
    .AddEntityFrameworkStores<ApplicationDbContext>()
    .AddDefaultUI();
 
services.AddAuthentication().AddGoogle(options =>
{
    options.ClientId = Configuration["Google:ClientId"];
    options.ClientSecret = Configuration["Google:ClientSecret"];
});
 
services.AddRazorPages();
services.AddServerSideBlazor();
 
services.AddScoped<AuthenticationStateProvider, RevalidatingIdentityAuthenticationStateProvider<ApplicationUser>>();
 
services.AddDatabaseDeveloperPageExceptionFilter(); // 개발 환경에 유용한 오류 정보 제공
 
services.AddSingleton<WeatherForecastService>(); // 나중에 삭제
cs

ConfigureServices 내부에 SQLLite로 되어 있는 부분을 Mysql로 변경하고 AddDefaultIdentity는 AddIdentity로 변경~ 인트라넷을 만드는 중이라 가입 후에 이메일 체크가 필요 없기 때문에 RequireConfirmedAccount 부분을 삭제하고 구글 로그인 부분을 추가했다. 그리고 RevalidatingIdentityAuthenticationStateProvider쪽도 ApplicationUser로 변경해준다. 그 밖에 Startup.cs의 나머지는 자동 생성된 코드와 동일하다.


아직 끝이 아니다. Area/Identity/Pages/Account/LogOut.cshtml 그리고 Area/Identity/Pages/Shared/_LoginPartial.cshtml에서도 IdentityUser를 변경해준다. 이제 Data 폴더 안에 마이그레이션 폴더를 삭제하여 기존 정보를 없애고 새롭게 MySQL 디비를 업데이트 하자.


> dotnet ef migrations add Initial

> dotnet ef database update


위와 같이 MySQL에 테이블들이 업데이트된 걸 확인할 수 있다.


이제 실행하고 우측 상단의 Log in을 누르면 아래와 같은 화면이 짠~

Google 버튼을 누르면 익숙한 로그인 창이 나온다. 첫 로그인의 경우 EMail을 입력하라고 나올 것이고 입력하면 MySQL에 사용자 정보가 들어가고 로그인은 완료된다.


간단하게 구글 로그인은 끝났다. 이미 MS가 처리해주는 부분이 많아서 사실 코딩보다 세팅할게 더 많다. 근데 이대로 사용하기엔 무리가 있다. 온통 영어로 나오는 페이지들도 그렇고 첫 로그인에서 Email과 함께 Name을 받는 다거나 커스터마이징이 필요하다.


그러므로 수정이 필요한데 로그인 하면서 봤던 페이지들은 프로젝트 폴더 어디에도 보이지 않으므로 스캐폴딩을 통해 끄집어 이런 부분을 해결해야 한다.


다음시간에 해보자~


참고로 구글외에 페이스북이나 다른 로그인이 필요하다면 아래 페이지를 참고하고


ASP.NET Core에서 Facebook, Google 및 외부 공급자 인증

이 자습서에는 외부 인증 공급자에 OAuth 2.0을 사용하여 ASP.NET Core 앱을 빌드하는 방법을 보여줍니다.

docs.microsoft.com

아까 삭제한 이메일 체크와 관련된 부분이 필요하다면 아래 페이지를 참고하자.


ASP.NET Core의 계정 확인 및 암호 복구

전자 메일 확인 및 암호 재설정을 사용 하 여 ASP.NET Core 앱을 빌드하는 방법을 알아봅니다.

docs.microsoft.com

#End.Code123 "자바스크립트 안녕~"

+ Recent posts